

Using Text Modules in the IntellCRE Brochure Builder
Adding Text Modules
Hey everyone.
In this tutorial, we’re going to explain everything that you need to know about text modules and how to work with text, adding text blocks, customizing text blocks so that your brochures look the best.
So let’s get into it.
First of all, note that we have a special text block that is the header or the page title module.
This one behaves slightly differently, as it has some quick options such as the overline here that you can use and then the main header for the page.
You can work with this in the same way as you can work with any text module, but it is designated separately as the header module.
Usually, it comes with every page, but you do have the option to delete it as with any other modules.
For the sake of this tutorial, we’re going to actually show you how to add a new text module.
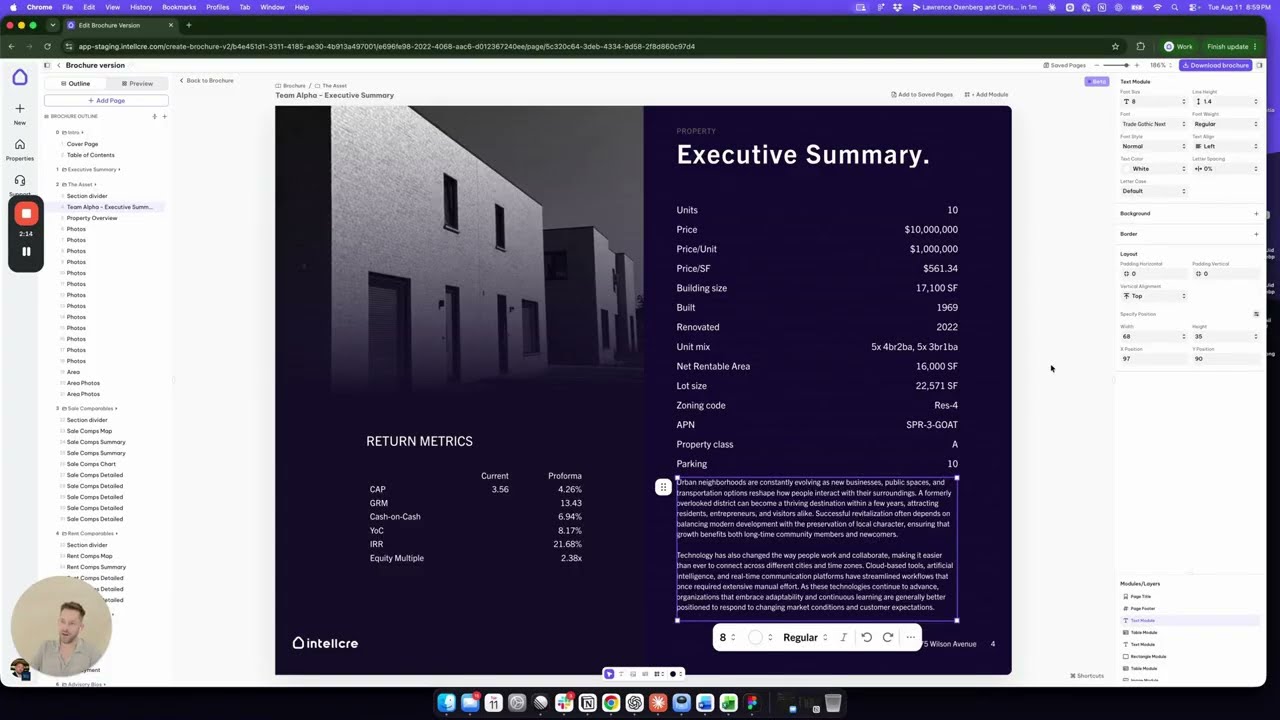
You go to Add Modules and you select Text, and then using the grid, you can place the text anywhere in your brochure.
You can, as with other modules, resize it as you need.
Once you have a text module, you can simply start typing or you can paste a given text into the text module, and you can start customizing it.
Font and Text Settings
Once you click on the text module, on the right side you can control the font size.
We’re going to use a slightly smaller font size, eight.
You can control the color.
We have black here, but we’re going to switch it to white so we can better see the text.
You can control the line height of this.
Basically, if I choose the line height not 140% but only 100%, this becomes more dense vertically.
You can control the letter spacing.
This is horizontally making it less dense horizontally.
When we choose letter spacing, maybe 5%, as you can see, the text is more spread out like that.
All these options, including the alignment.
Let’s say we want this to be center aligned here on the right side.
Center align or right align and so on.
Font Selection
Note that we can also control the font for this text module up here.
That’s one of the differences: the page title usually comes with the title or header font, whereas a regular text block comes with a body font default setting.
But you can control the font directly here.
Text Layout and Padding
You can also control the layout.
Here I have a text block.
Let’s say I want to have horizontal padding.
I’m going to use 10-pixel horizontal padding.
You can also control the vertical padding.
Now we’re going to add 10 pixels of vertical padding, or we’re going to basically go back.
You can control the alignment of the text within the module.
Now it’s top aligned.
Now it’s bottom aligned.
Now it’s center.
We can again control the width and height of the module.
Borders and Backgrounds
As with the other modules, we have the option to add a border.
We’re going to add a yellow border here so we can see it.
Or we can add a background.
This is important when you’re using text over any text module that is placed on top of an image, maybe, or some varying-colored background.
If you want to make sure that the text is visible, you can use the background.
In this case, let me use a black background.
Actually, black, right?
So now the text is on a black background.
You can also use a background that is not solid but gradient.
As with all the gradients in the builder, you have the starting color, ending color, and basically controlling the gradient opacity, controlling the gradient position, and also controlling the gradient direction.
Now we have it vertical.
Now we have it horizontal.
You can also flip the gradient like that.
So now we’re going to get rid of the gradient and the background.
Rich Text Options
Now let’s look at some rich text options.
Let’s say I want to make the neighborhoods bold.
You can just select any part of this text in the module, and you have separate options for the selected text.
If you just want to make the neighborhoods bolder, you can go to either Selected Text Options and here find Font Weight, or you can do it directly from here.
As you can see, for the Arial font, we have the Light, Regular, and Bold settings.
So you can control the boldness of the text.
Let’s say I want to turn this text into bullet points.
You can just select the text, and right here on the right side, bullet points with bullets or bullet points with numbers.
Down here, we can also switch this to bullet points.
Then you can style this as any bullet point list.
If you want to control the space between the bullet points, you can add a line, and then clicking Enter again, we’re going to create a two-line difference here.
You can make certain text, maybe “newcomers,” italic, underlined, crossed out, and things like that.
So you have all the options of a text rich text editor here available.
Text Contrast and Page Padding
You want to make sure that the color of the text module — sorry, the color of the text — is contrasting nicely with the background.
If we have darker backgrounds like on this page, obviously we’re using white or gray, light gray versions for the text color.
If we are on a lighter background, then we would use a darker font.
We want to make sure that the paddings and alignments are there.
Here, when you click basically anywhere but on any module, you see the padding option for the entire page.
We have a 40 global padding.
We can switch this to 20, which is basically going to make sure when you grab a module, you see the red.