
Managing Saved Pages and Saved Outlines in the IntellCRE Brochure Builder
Managing Saved Pages
Hey everyone, welcome to this tutorial where we’re going to explain how you can create saved pages, manage your saved pages, manage them into folders or without folders, and assemble saved pages into outlines, how you can manage your document outlines, and then how you can reuse them for your future marketing assets.
So, let us start by actually showing you where you can access and manage your saved pages and saved outlines.
You’re going to navigate to Settings.
In Settings, we have a brochure category here.
You’ll navigate to Saved Pages.
Here on the left, you’re going to see all the folders that you have for saved pages and then all the saved pages in those folders.
Note that you can create a saved page that does not have to be in any folder.
You can create folders directly from up here.
So, New Folder → Anton’s Pages.
I’m going to create a folder like that that’s going to appear here, and I can take this page, My Saved Page 00, and I can put it in the folder.
And now I have a folder with my saved pages, and I have this saved page over there.
In this way, you can categorize your pages into folders depending on the design style or depending on the type of the document, whether it’s an OM or a BOV page, or simply perhaps with the logic of sections.
So maybe you have a marketing section that you’re using for your BOVs that talks about your marketing plan.
So you can create a folder here that is called a marketing plan, and all the custom pages can be stored within that folder.
It’s good to have this folder structure because when you’re adding a page to your brochure, you’re going to be seeing the folders and the pages within those folders.
And actually, let me show you how that works.
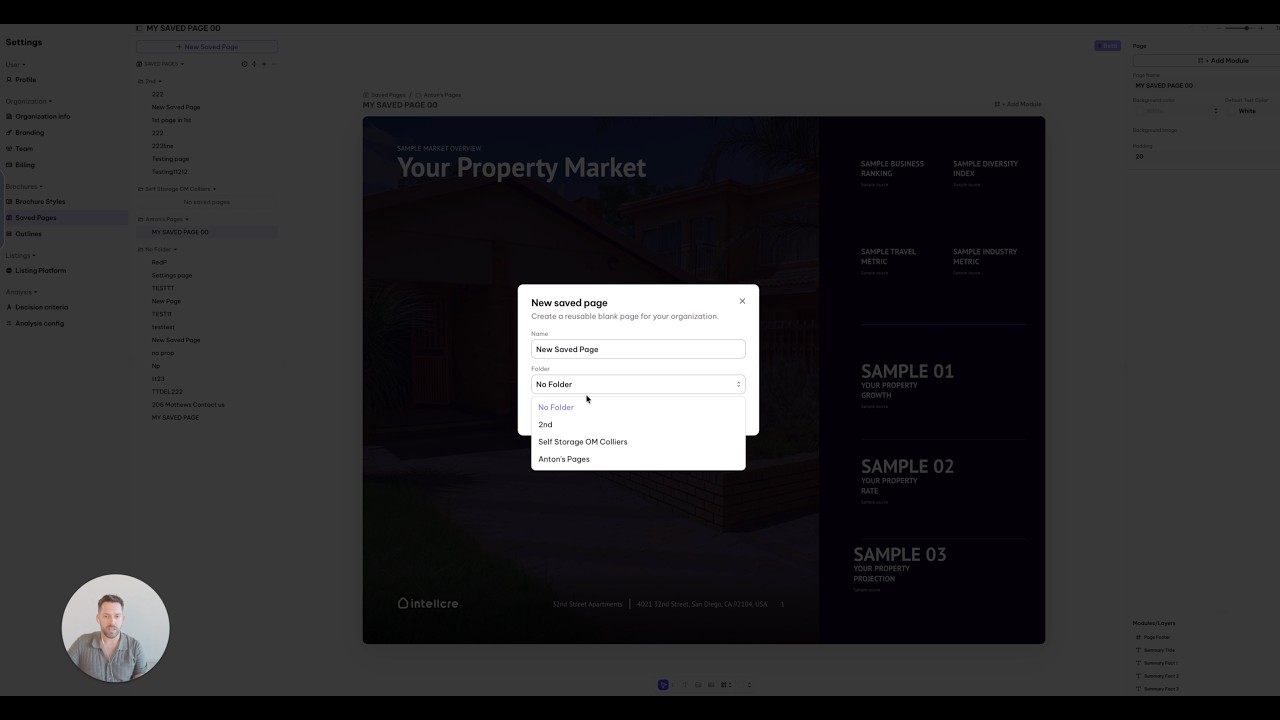
But before that, just note that you can also create a new saved page directly from here.
Assign it to a folder if you need to, or leave it without a folder.
And basically, if you click Create, you have a blank page, and this is a page builder.
So you can use all the tools in the page builder to build a new page here and have it in your saved pages.
Adding Saved Pages to a Brochure
Then, when you are working on a deal, let me take this one for example.
Go to a brochure version, and you want to add a page from your saved pages.
You’re going to click Add Page.
You’re going to navigate to My Saved Pages, and here you just see the folder structure.
I’m going to choose the Anton Pages folder, and I’m going to choose this page and I’m going to add it to my document, just like that.
Okay.
So those are saved pages, again located in the Settings, in Saved Pages, and here you can manage them.
So you can delete them, you can rename them from here — three dots, Rename.
You can change the name, you can change the folder, all of that is here.
Managing Saved Outlines
Now let’s look at saved outlines.
So if we go to Outlines here, the same thing happens here.
So I can create a folder — New Folder.
And this is going to be my OM Outlines, or my OM for short.
So I’m going to have a folder for OM.
And then in this folder, I want to create my first outline.
So I can go to the three dots and click New Outline.
Or also, I can click this button up here, New Outline.
I’m going to put it in the OM folder.
Here you can choose between single page layout, OM, or booklet style.
And here you have a starter outline, which is just the configuration you’re starting with.
So I’m going to start with a full outline right here.
And I’m going to name this outline.
So this is going to be my Anton Premium OM is going to be the name.
Or you can base this name on perhaps an example OM that you have.
So if you’re working with our premium service and our implementation team is setting up the outlines for you, we can call the outline, say, OM, and then in brackets basically tell you the deal or the deal package that we base this outline on.
Okay.
So we’re going to start with a full outline, and on the right side here you see the outline.
So we have a section structure.
We have Intro, Asset, Tenant Overview, Sales, Rent Comps, Market Overview, Advisory Bio, Outro, and you can fully customize this outline.
So if you don’t need this section, you can click three dots, Remove.
If we don’t need the Advisory Bio sections, you’re going to click three dots, Remove.
And basically, right now, these are the sections that we’re going to have, and these are the pages that we have within those sections.
So you can basically customize each page separately.
You can change the position of the pages.
You can add pages.
You can add pages that are either system default pages or we can add any page from the saved pages.
So if I click Add Page to Outline, we are either going to add any page from the system default pages or we can add any page from the saved pages.
So I’m going to add the My Saved Page 00.
And that page is added, as you can see, to the end of my document.
And you can click it and you can add it maybe in a Market Overview.
Right?
So now in the Market Overview, we have the Section Intro, and then I have my saved page that I added to the outline right here.
Right?
So in this way, you can also add sections.
So you can click up here, plus Add Section, or down here we also have Add Section.
And I’m going to call this section — I’m going to, sorry, remove this one.
I’m going to click three dots, Rename.
I’m going to name this My Section.
And now I can also place the section anywhere.